Tips: When you see this prompt, it means that the current article has been migrated from the original emlog blog system. The publication time of the article is too long, and the formatting and content may not be complete. Please understand.
View the AndroidManifest.xml file of the APK installation package on Android
Date: 2020-4-19 Ajue Code Fiddle: 946 times Comments: 5
CauseLast week, when working on the push function of the Android system, some models could not be pushed offline by the manufacturer, so I was ready to unpack the APK to see if there was a problem with the packaging parameters.
Preface
In Android development, it may be necessary to jump from our own application to the interface of another application. However, it is difficult to do this without knowing the package name and class name of the other application. The simplest method is to download the APK file of the application, and then change the file extension to zip or rar. After that, unzip the file. In the extracted files, there will be an AndroidManifest.xml file. However, when you open it, it may be garbled. So, what should you do?
AXMLPrinter2.jar is a commonly used APK decompilation tool, mainly used for decompiling APK files, including package name, version number, and icon information. AXMLPrinter2 can be used to decompile and view the AndroidManifest.xml file in plaintext.
Usage
1. Download the AXMLPrinter2.jar tool from the following address: https://code.google.com/archive/p/android4me/downloads
2. Copy the AndroidManifest.xml file to the same folder as the tool.
3. Open the command prompt in the current folder.
4. Execute the following command:
``` java -jar AXMLPrinter2.jar AndroidManifest.xml >> AndroidManifest.txt ``` After executing this command, an AndroidManifest.txt file will be generated in the folder, which is the decoded file.
Of course, there may be some errors after execution: 'java' is not recognized as an internal or external command, operable program or batch file.
This is because Java environment is not installed or environment variables are not configured.
Install JDK
First, let's review the process of installing JDK.
1. Download and install JDK.
Choose to download JDK 1.6, 1.7, or 1.8. Download the one you want to use.
Download JDK from the official website: https://www.oracle.com/technetwork/java/javase/downloads/jdk8-downloads-2133151.html
The installation is simple, just click "Next" without thinking, and I won't go into details here.
2. Configure JDK environment variables.
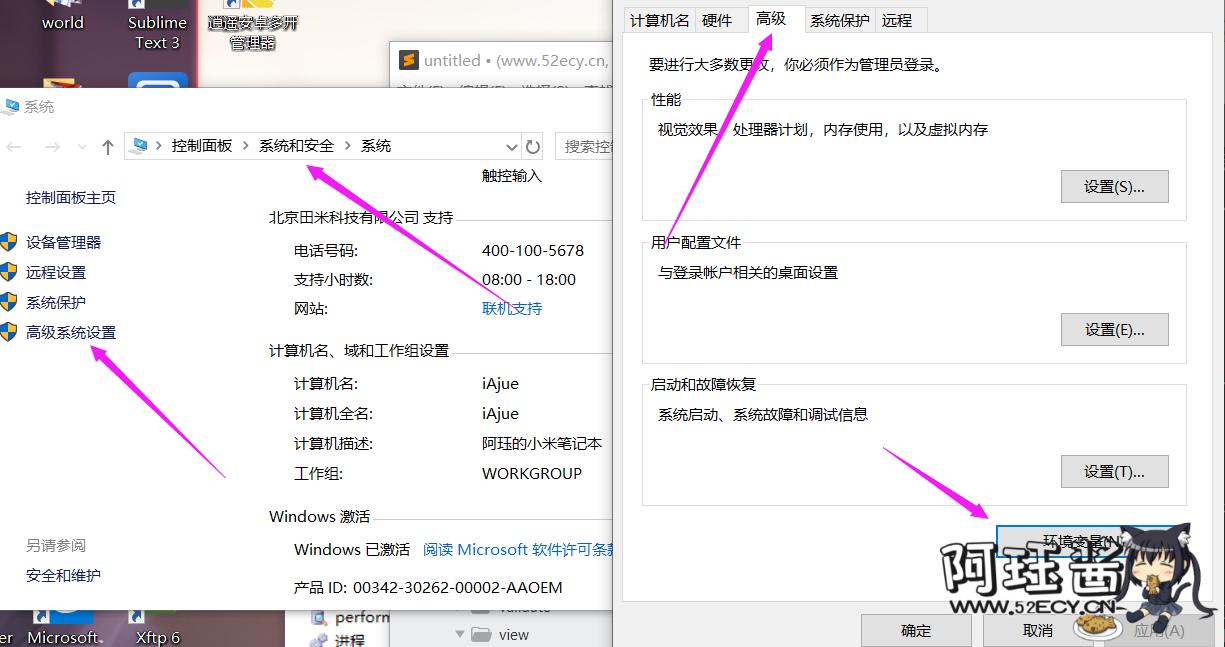
(1) Right-click on "My Computer" or "This PC" (for Windows 10), select "Properties", select "Advanced system settings", and in the new interface, select "Environment Variables". We only need to edit "System variables".

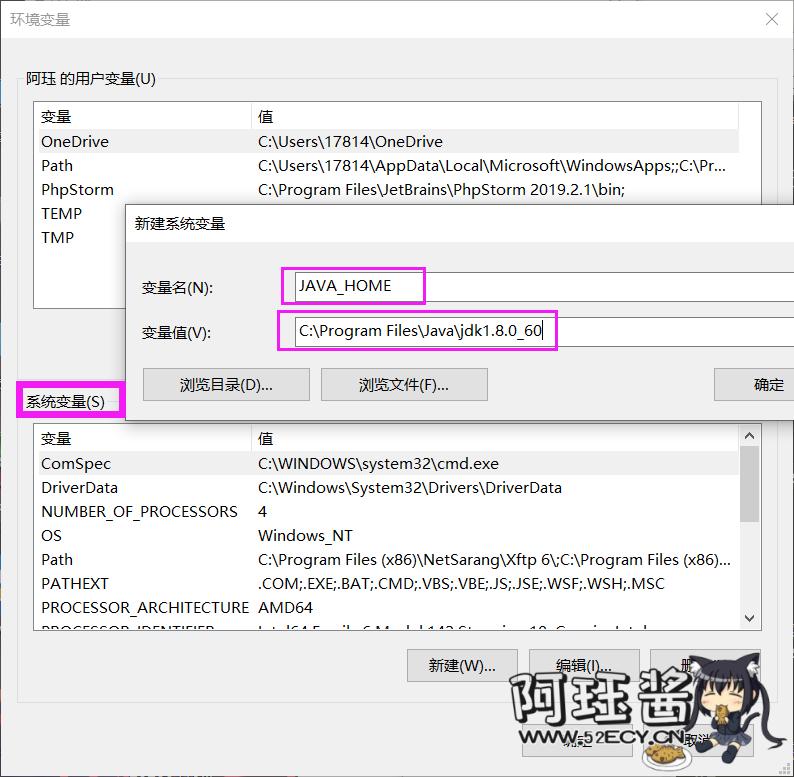
(2) Click "New" to add a variable named "JAVA_HOME" with a value of "C:\Program Files\Java\jdk1.8.0_60". This value is the path where you installed JDK. Use the address where you installed it.
 Then, create another variable named "CLASSPATH" with a value of ".;%JAVA_HOME%/lib/dt.jar;%JAVA_HOME%/lib/tools.jar", and click "OK" to save. Note that the ".;" in the value should not be omitted, and every symbol should not be missing.
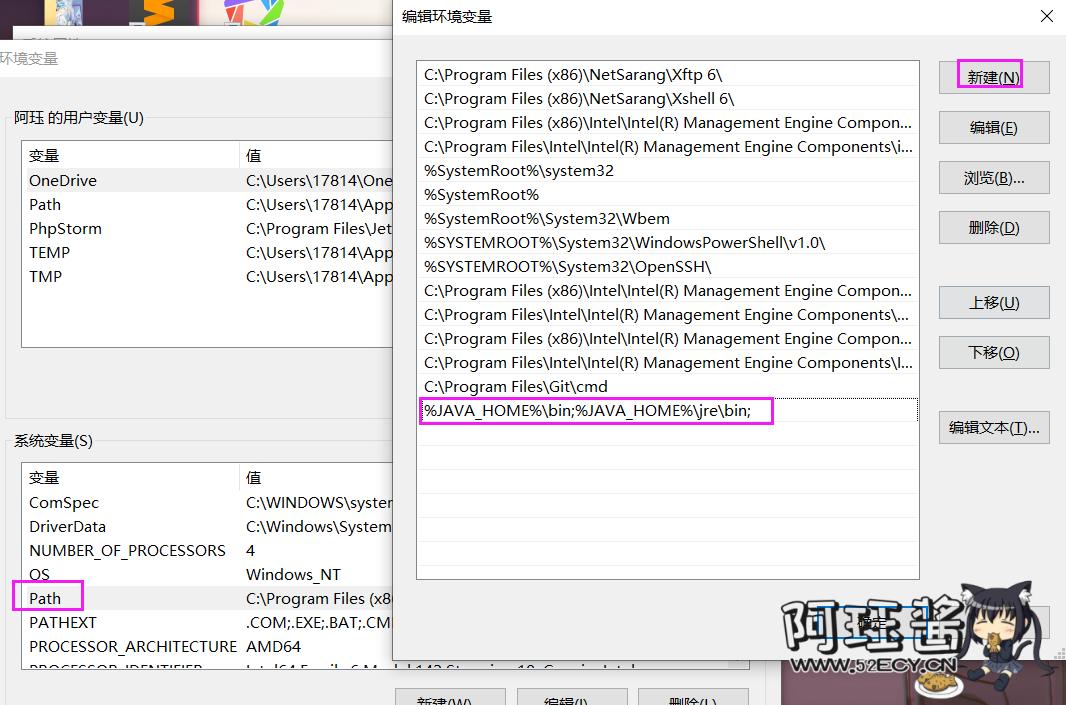
Now comes the most critical step. Look for a variable named "path". It can be in any case, create a new one if it doesn't exist, or directly edit it if it exists.
If you already have the "path" variable, it must contain some content. We don't care about it. To make it easier to edit, copy the variable value first.
Then paste the content into a text editor, add "%JAVA_HOME%\bin;%JAVA_HOME%\jre\bin;" to the beginning of the content, and the result is as follows:

Then copy the entire value and paste it into the variable value that was edited earlier, and click "OK" to save.
Let's review the steps above. A total of three values were added:
JAVA_HOME: C:\Program Files\Java\jdk1.8.0_60
CLASSPATH: .;%JAVA_HOME%/lib/dt.jar;%JAVA_HOME%/lib/tools.jar
PATH: %JAVA_HOME%\bin;%JAVA_HOME%\jre\bin;
The following is to verify whether the installation is successful.
Press Win+R to open the Run dialog, type "cmd" to open the command prompt.
Enter "java", and a lot of operation prompts will be displayed normally.
Enter "java -version", and the version number of the installed Java will be displayed normally.
Enter "javac", and some usages of javac will be displayed normally.
That's it!
User Comments:
Shenzhen Adult College Entrance Examination 7 months ago (2020-09-26)
This method from the blogger is quite useful. Excellent indeed. [#aru_22]
Yi Yan 12 months ago (2020-04-25)
Why do you know so much? [#aru_2]
Ajue 12 months ago (2020-04-25)
@Yi Yan: Maybe this is what an excellent person is like. [#aru_36]
Jerry 12 months ago (2020-04-24)
[#This comment is a private comment]
Ajue 12 months ago (2020-04-24)
@Jerry: Well, it can't be used anymore.